
MEET KIT
Optional add-on
KIT is a helpful buddy inside AmiKit, utilizing the latest and greatest AmigaGPT 3 by Cameron Armstrong - a world premiere exclusively debuting in AmiKit X13. He lives in the Amiga Shell (KIT, not Cameron), from where you can call him anytime with Left Alt ⌥ + A
KIT is far more than a chatbot. He's capable of performing various system operations, searching for files, creating archives, managing backups, etc. If you can describe it, KIT can do it (most likely). Just don't expect miracles. Or do - he's trying his best.
On top of that, KIT has his own personality and won't blindly follow your orders either - he is cautious and puts system safety first, so he will always request your permission before executing any command or program.
By the way - you can speak to him in any language, even a programming language if you prefer. We cover his OpenAI bills every month so he can fully dedicate himself to the requests you throw at him.
Okay, not everyone is thrilled about AI sneaking into everything - and honestly, fair point.
To respect that, AmigaGPT 3 and KIT are not part of the default X13 upgrade.
Install them on the KIT tab of the Setup app (right-click the desktop > AmiKit > Setup)
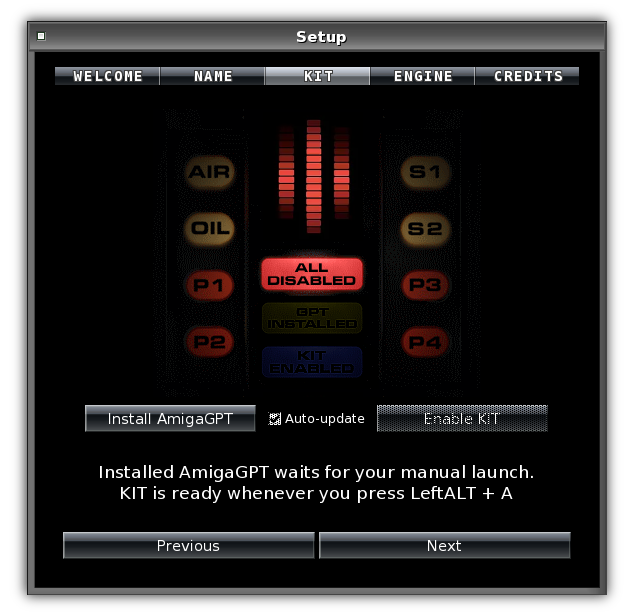
AmiKit:Internet drawer. It is a passive install - just a program sitting there, waiting for you to launch it.
From the technical point of view, AmigaGPT and KIT are powered by the latest gpt mini model, foolishly sponsored by Jan from AmiKit.
Each user has a dynamically allocated fair-use allowance of prompts per timeframe, so everyone gets a fair chance to interact with KIT.
To keep the budget sustainable, Jan may (and will) adjust the model to a cheaper one or temporarily pause AI features if resources run low.
MASTERING AMIKIT
Double-Click on Desktop Anywhere
OKAY, FIRST THINGS FIRSTOnce your AmiKit is installed and updated, make a backup of the installed AmiKit folder/app before doing anything else.
That way, if anything goes wrong, you can restore it instantly - no reinstalling, no fuss.

Power Keys
Toolbar Buttons


")


")


Hover over any button above for more details
 button to open pull-down menu
Beyond the Basics
Color badges indicate which modifier key to hold:
AMIGA ❖/⌘ = ❖ key on Windows/Linux or ⌘ Cmd key on Mac
Directory Opus Lister
Press Space while in desktop or in a Lister (Icon or Name mode) and then use cursor keys ←→↑↓ to navigate and ⏎ to open the selected entry.
Type letters to find a file. Type capital letters (e.g. Shift ⇧ + A) to find a drawer.
F2 Toggle between Name and Icon view
F3 View selected entries in Multiview
F4 Edit selected entries in microgolded
F5 Copy selected entries to Destination
F6 Move selected entries to Destination
F7 Create a drawer
F9 Calculate size of selected drawers
Num + − Deselect all
Num + * Invert selection
Num + / Go to root
Backspace ⌫ Go to parent drawer
Ctrl ⌃ + F6 Move As
Ctrl ⌃ + R Refresh drawer
Ctrl ⌃ + F Find files
Ctrl ⌃ + X Cut to clipboard
Ctrl ⌃ + C Copy to clipboard
Ctrl ⌃ + V Paste from clipboard
Shift ⇧ + Ctrl ⌃ + V Paste As from clipboard
Shift ⇧ + Ctrl ⌃ + F5 Duplicate selected
Lister Display Mode
Switch Lister among more view modes:
Right AMIGA ❖/⌘ + ] Icon mode
Right AMIGA ❖/⌘ + ; Show all files or files with icon only
Right AMIGA ❖/⌘ + ' Icon Action mode (with Toolbar displayed)
Arranging windows
Right AMIGA ❖/⌘ + - Tile horizontally
Right AMIGA ❖/⌘ + + Tile vertically
Did You Know?
- Help is always just a keystroke away. Hitting the Help key (or PageDown ⇟) in any Directory Opus window brings up a contextual guide. You can also find detailed PDF manuals in the
DOpus5:Helpdrawer. - You can easily set up your own customized hotkeys. Right-Click anywhere and head to "Settings" → "Hotkeys…", or simply press Right AMIGA ❖/⌘ + 7.
- You can lock your mouse cursor to move in a perfectly straight line. Hold down the Left Ctrl ⌃ key, and it will restrict your movement to purely horizontal or vertical.
- You can boot straight into the classic Workbench instead of Directory Opus. Just hold down the Shift ⇧ key on boot.
Edit Actions for Specific Filetype
- Right-Click & Hold over a file in Name mode and select the entry starting with an asterisk (*), for example *Video, MOV to edit left-click and right-click actions on all files of that kind.
Control Mouse with Keyboard
- To control your mouse pointer, hold down the Left or Right AMIGA ❖/⌘ key and use cursor keys ←→↑↓.
- Simulate left or right mouse click with Left AMIGA ❖/⌘ + Left Alt ⌥ or Right AMIGA ❖/⌘ + Right Alt ⌥.
- Access right-mouse button menus by Space + Right AMIGA ❖/⌘, then use cursor keys to navigate, ⏎ to select.
Change Wallpaper
- Right-Click & Hold over an image file in Name mode and select Set as Wallpaper. To save it permanently then Right-Click an empty desktop area, choose Settings > Environment, and click the SAVE button.
Last But Not Least
Screen Settings in the ENGINE tab of the Setup app
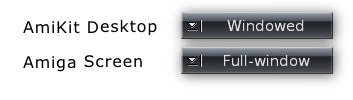
AmiKit Desktop
For the AmiKit desktop and modern apps (RTG screen)
Amiga Screen
For classic Amiga games and demos (native PAL/NTSC screen)
FULL-WINDOW IS RECOMMENDED FOR BOTH
(or Windowed, which is the next-best option)
If the AmiKit desktop is not sharp and looks distorted in Full-window, make sure that your AmiKit desktop and your host desktop screen resolutions match. If they don't, try a different 32-bit screen mode resolution in AmiKit:Prefs/ScreenMode, hit SAVE and reboot.
If anything goes wrong, boot with no Startup-Sequence by holding both mouse buttons on AmiKit boot, then type ScreenReset and reboot. On the next boot, the ScreenMode requester will appear automatically.